
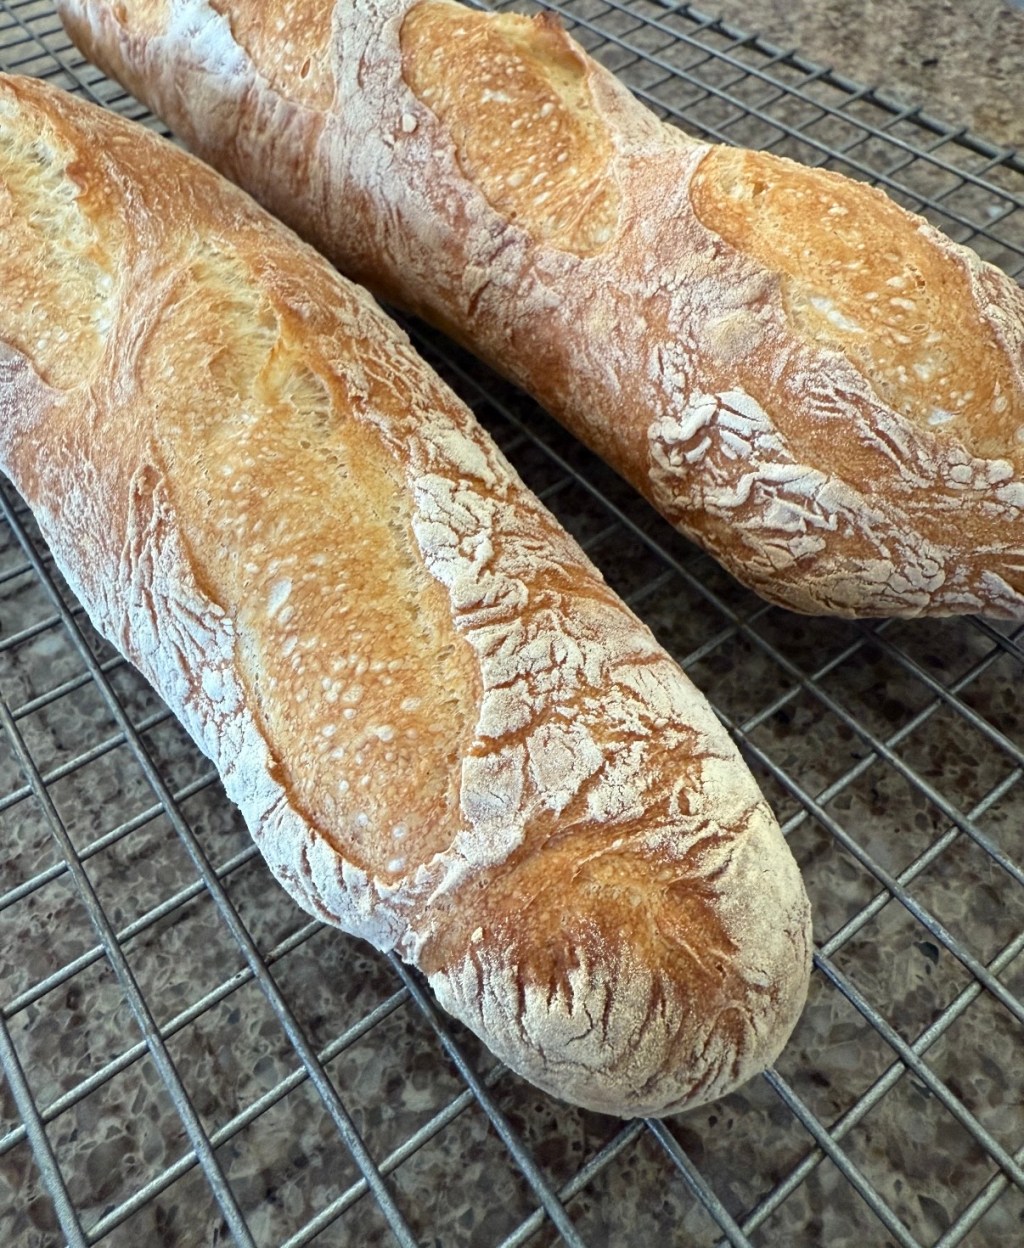
It’s ironic that this incredibly long recipe, once mastered, is quite the opposite of time-consuming! Doing a few steps here and there over a two-day period, et voila! You have extraordinary bread and oooh, the aroma as they bake! This is also a lovely recipe for providing the bread for a Panzanella Salad or Riboletta Soup (Tuscan Bean Soup).
Authentic French Baguettes
Equipment to Make Bread Making Easier
While work-arounds can certainly be made here, I’ve found that investing in the necessary equipment to make well-formed, classic-looking baguettes can help make them much easier to make!
- A 4-by-20-inch wooden transfer peel for gently moving the delicate loaves
- A 13-by-20-inch wooden board, rimless baking sheet or a pizza peel for sliding them into the oven. Make sure it’s at least 18 inches long and 12 inches wide to accommodate the loaves. Both can be bought online from specialty baking sites, or you can visit a hardware or home improvement store and have pieces cut from 1/4-inch plywood.
- A lame or curved razor blade attached to a handle, which slashes cleanly through the soft dough so it expands evenly in the oven. You can find one at well-stocked kitchen stores and online, though a utility blade from the hardware store makes a decent substitute.
- A baking stone. This does an amazing job of radiating heat up and into the dough, helping the loaves rise rapidly and bake to a burnished finish. You could bake the loaves on a large upside-down baking sheet, but you won’t get the same results.
- A digital scale. Weight, not volume, is by far the most reliable method for measuring flour! Digital scales are available at a variety of prices ($10-$50), both online and in most good grocery stores.
Plan your Timeline
Once you have all the equipment, plan your timeline. The process starts with the making of a poolish (a type of preferment, like sourdough starter but made with store-bought yeast) on the morning of the first day. You then mix the dough in the afternoon followed by an overnight rest in the refrigerator, which helps improve the bread’s flavor and the quality of the crust, (and also affording you some flexibility as you can bake at your convenience the next day). The recipe makes three baguettes, but if you don’t want to bake them all at once, you can return a portion of the dough to the refrigerator and bake it later.
Flour Selection
A successful baguette, with a thin, ultra-crisp crust and holey, creamy-tasting interior, hinges on flour selection. You want a flour that will facilitate enough gluten development to trap gas produced by the yeast to create interior holes of varying sizes, but not so much that the dough has a hard time extending into its hallmark long, thin shape. This means using flour with a 10 to 12 percent protein content (check the side of the bag for this information). At 11.7 percent, King Arthur all-purpose flour is a good, widely available choice, and it contains a little bit of barley malt, which enhances fermentation and flavor.
DAY ONE
Make the Poolish
Your first step is to combine a small amount of yeast, water, and flour to create a liquid preferment. This needs to sit at a warm room temperature for 6 to 7 hours until it has tripled in volume and is very bubbly. A poolish allows for more flavor development and a better crust (see What is a Preferment, bottom of recipe).
1/8 tsp instant yeast
7 T (60 g) all-purpose flour, with 10 to 12 percent protein content (such as King Arthur all-purpose flour)
1/4 cup water (60 g) water at 75-80°F
In a plastic lidded container (preferably quart-size, or anything with straight sides and a similar capacity) and stir briefly to dissolve the yeast. Add the flour and mix, scraping along the sides of the container, until thoroughly combined and you have a thick, sticky paste. Smooth the surface, cover and mark the height of the mixture on the side of the container using a tape or rubber band. Let sit at warm room temperature (preferably around 75 degrees) until it triples in volume, and the surface, which should teem with fine bubbles, is slightly domed, 6 to 7 hours (but possibly more or less depending on the ambient temperature).
Make the Dough
3-1/2 cups + 3 T (500 g) all-purpose flour with 10 to 12 percent protein content, plus more for dusting
1-3/4 cups (375 g) water at 75-80°F
1/2 tsp instant yeast
1 tsp fine sea salt
Semolina flour, for dusting
Add the water and yeast to the poolish first and stir to dissolve, then add the flour and sea salt. Using a bench scraper or flexible spatula, mix, making sure to scrape the bottom and sides of the bowl, until all of the flour is moistened and you have a soft, shaggy dough.
Knead
Because the final dough should be strong but not too strong, the kneading is best done by hand. Having said that, handling baguette dough, which is soft and a little sticky, can be tricky. You want to leave the dough a little underdeveloped, meaning it won’t feel particularly smooth or elastic after mixing:
Hold the bowl stable with one hand, and use your other hand to knead the dough, grasping a handful at the edge, pulling it upward and then pressing it back into the center. Continue to knead, rotating the bowl as you work, until the dough has firmed up slightly and starts to give you some resistance, about 5 minutes.
If you do prefer to use a mixer, use a dough hook on low for 1-2 minutes.
At this point, the dough will still be sticky and textured but should somewhat hold its shape. Scrape down the sides of the bowl, then, scrape all the dough into a straight-sided lidded container with a 4-quart capacity, if available to you, coated with a bit of water or very thin layer of neutral oil to prevent sticking. If not, scrape the dough into a single mass in the bowl. Cover the container or bowl and use a piece of tape to mark the height of the dough on the side.
Proof for One Hour
Bulk fermentation: Let the dough sit at warm room temperature (preferably around 75°F), for one hour.
Stretch and Folds
Now it is time to give your dough a series of stretches and folds which will encourage the gluten development as the dough rises. By the end, the dough will feel strong, smooth and much less sticky.
Uncover the dough and, using damp hands, (or a dough scraper) scoop underneath the dough along one side of the container or bowl with both hands and slowly lift it up and out of the container or bowl to stretch it, then lower it back down so it folds onto itself. Repeat this folding process three more times every 30 minutes, rotating the container or bowl 90 degrees each time and rewetting your hands to prevent sticking. (You’ll notice the dough will now feel stronger and smoother and hold its shape better.)
Proof Until Dough has Grown 50% in Volume
Cover the dough again and let it sit, until the dough has grown about 50 percent in volume and is smooth and elastic.
Cover and Refrigerate for 12-24 Hours
At this point you can cover and refrigerate for 12 to 24 hours. This cold proof will give the dough a final kick of flavor, however, many bakers believe that if using a preferment, this step is optional.
DAY TWO
Remove the dough from the refrigerator and take a look at it. If it hasn’t doubled from its original size during its rest in the refrigerator, let it sit out at room temperature until it reaches this point, 1 to 2 hours. If it looks doubled right out of the fridge, proceed to the next step.
Divide Dough
Lightly dust your work surface with flour, then gently scrape the dough onto the floured surface. Use a bowl scraper, bench scraper or knife to divide the dough into 3 equal portions. (To ensure even loaves, use a scale; each should weigh about 330 grams.)
Preshape the Dough
Very lightly flour the surface of each piece of dough. Working one piece at a time and, using floured hands, gently pat the dough into a square measuring about 6 inches across. Working from the side farthest from you, roll the dough toward you into a tight cylinder. Place the cylinders on the floured work surface seam-sides down, leaving several inches of space between them, and cover with a clean kitchen towel. Let rest for 20 minutes.
Prepare the Oven
While the dough is resting, arrange one oven rack in the center position and another in the lower third. Place a 20-inch-long baking stone on the middle rack and a large cast-iron skillet or metal pan on the lower rack. Heat the oven to 500°F.
Prepare the Cloche (or Cloth)
Place a thick kitchen towel (or, if you have one, a linen couche) on a rimless baking sheet that’s at least 18 inches long (or, if you don’t have one, an upside-down rimmed baking sheet). Generously dust the towel with flour and set aside. [Note: If you do own a couche, it’s important not to wash it. Note the manufacturer’s care instructions).
Shape the Baguettes
Lightly flour the work surface, then use the scraper to quickly lift one of the cylinders and turn it over onto the floured work surface so it’s seam side up on the floured surface. Very lightly dust the dough with flour and use floured hands to pat it down gently, popping any larger bubbles and flattening it into a rectangle with the short ends oriented to the left and right. Fold the long end opposite you down over the bottom half, leaving the lower third of the dough uncovered. Rotate the dough 180 degrees, then fold down the uncovered third of dough (the side farthest from you) so you have a long cylinder of dough with a seam running through the center. Starting at one end and working your way to the other, fold the dough in half lengthwise by bringing the top half down over the bottom and pressing firmly along the seam to seal. Throughout the shaping process, if the dough sticks to your hands or the surface, dust with just a bit more flour. Applying light downward pressure with both palms and starting in the center and working outward, roll out the dough to a length of 18 inches, doing your best to make it as even as possible and tapering the ends. (You can also make six demi-baguettes here, approximately 9 inches long).
Transfer the Baguettes
Transfer the shaped dough to the floured towel or cloche, placing it seam side up in the middle. Pleat the towel on either side of the dough to create a barrier, then repeat the shaping process with the two remaining portions of dough and place them on the floured towel on either side of the first so all 3 pieces are sitting snugly next to one another. Fold the ends of the towel up and over the dough to cover. (Use a second towel if necessary.)
Proof the Baguettes
Let the baguettes sit at warm room temperature (preferably around 75 degrees) until they’re about 50 percent expanded in size, 30 to 60 minutes. To check if they’ve finished their proof, poke the dough gently: If it takes a couple of seconds to spring back and holds a slight indentation, it’s proofed. If the dough springs back quickly, it’s not quite ready, so let it proof a little longer.
Other Preparations for Baking
Boil water for steam and prepare the parchment: While the dough is proofing, bring 1-1/2 cups of water to a boil in a kettle or saucepan, then set aside. Place a piece of parchment paper about the size of your baking stone over a rimless baking sheet or a thin wooden board and dust lightly with semolina flour.
Transfer the Loaves
Uncover the dough and pull on the ends of the towel to flatten the pleats, separating the loaves. Lightly dust the tops of the dough with flour. Working one at a time and using the towel to help you, flip one of the outer baguettes onto a thin wooden board measuring about 20 inches long and 4 inches wide (also called a baguette transfer peel; you can also have one cut at your local hardware store) so it’s seam side down, then slide it gently onto the parchment paper, orienting it lengthwise. Repeat with the remaining loaves, spacing them out evenly on the parchment. (If the dough is covered with lots of flour from the towel, gently brush it off with a pastry brush, then brush it from the parchment.)
Score the Loaves
Use a razor blade or bread lame to score each baguette 5 times at a diagonal, angled down the middle of the loaf and parallel to one another. Try to slash deeply, confidently and quickly, as the blade will want to drag through the soft dough. For the best shape, hold the blade at about a 35-degree angle, rather than cutting straight down into the dough.
Bake
Carefully slide the loaves and parchment off of the baking sheet or board and onto the heated baking stone. Slide the lower rack out a couple of inches and pour the boiled water into the cast-iron skillet or saucepan and immediately close the door. (The water will instantly turn to steam, so protect your arms and work quickly so it doesn’t escape.) Bake for 10 minutes, then open the oven briefly to let out any steam. (Some ovens hold steam better than others, so there may not be any left at that point.) Reduce the oven temperature to 450 degrees and bake until the loaves are deeply browned, another 10 to 15 minutes. Use a pair of tongs to remove the baguettes from the oven and let cool.
Tips
Baguettes are best eaten within several hours of baking, but you can prolong their life by storing the loaves in a paper bag. To revive stale bread, spray the crust lightly with water and place in a 400°F oven for about 7 minutes.
Adapted from recipes and techniques by Claire Saffitz, Breadtopia and King Arthur Flour
What is a Pre-Ferment?
A pre-ferment is a portion of dough mixed in advance, typically six to twelve hours before mixing the final dough.Pre-ferments allow for a shorter rise of the final dough without sacrificing quality. It results in better-tasting bread, with more complexity than straight dough.
Recipes using pre-ferments may use either a POOLISH, which is wetter and has equal amounts of flour and water, or a BIGA, which contains less water and is stiffer. Pre-ferments contribute flavor, leavening, and keeping qualities to the bread.
POOLISH:
Origin: France. The name refers to the techniques of Polish bakers who brought their methods to France.
Similar to biga, this pre-ferment is added to the final dough mix to enhance flavor, providing a creamy nutty character and a crisp crust. It typically ferments for six to twelve hours.
It often contains 20-30 percent of the total flour in a recipe, generally with equal amounts by weight of flour and water, and a tiny amount of yeast. It improves keeping due to the acidity that accumulates as the poolish culture develops.
BIGA
Origin: Italy
Biga is a mix of somewhat stiff dough, consisting of 60 to 70 percent water, flour, and a very small amount of yeast. It must ferment for six to twelve hours before being added to the final dough mix. Bigas build up flavor-producing gases (carbon dioxide and alcohol), acids, and bacteria, which enhance the flavor of the bread when added to the final dough mix.
SOURDOUGH OR LEVAIN
Since a sourdough starter or levain is fed regularly and maintained over time, they are both considered pre-ferments.
Levain is the French term for “sourdough.” Both terms refer to a naturally leavened dough culture made from flour and water. They contain billions of active wild yeast cells and naturally occurring bacteria that ferment the bread dough, allowing it to rise. This method has been used for thousands of years, with humans making leavened bread from just flour, water, and salt, leavened by natural yeast present in the air and flour, creating a bubbly, fragrant dough.
Recipe Source/Adapted From
Any addition text here that will come after the recipe and not be included if printing.


Leave a comment